Dowding system
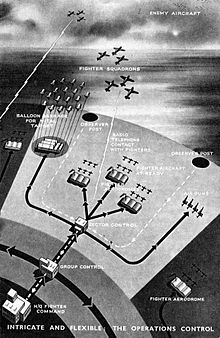
The Dowding system was the world's first wide-area ground-controlled interception network, controlling the airspace across the United Kingdom from northern Scotland to the southern coast of England. It used a widespread dedicated land-line telephone network to rapidly collect information from Chain Home (CH) radar stations and the Royal Observer Corps (ROC) in order to build a single image of the entire UK airspace and then direct defensive interceptor aircraft and anti-aircraft artillery against enemy targets. The system was built by the Royal Air Force just before the start of World War II, and proved decisive in the Battle of Britain.
The Dowding system was developed after tests demonstrated problems relaying information to the fighters before it was out of date. Air Chief Marshal Hugh Dowding, commander of RAF Fighter Command, solved the problem through the use of hierarchical reporting chains. Information was sent to Fighter Command Headquarters (FCHQ) central filter room at Bentley Priory and used to prepare a map of the battle. Details of the map were then relayed to the Group and Sector headquarters, where operators re-created the map at a scale covering their area of operations. Looking at the maps, commanders could make decisions on how to employ their forces quickly and without clutter. Instructions were relayed to the pilots only from the squadron's sector control rooms, normally co-located at the fighters' operating bases.
The Dowding system is considered key to the success of the RAF against the German air force (Luftwaffe) during the Battle of Britain. The combination of early detection and rapid dissemination of that information acted as a force multiplier, allowing the fighter force to be used at extremely high rates of effectiveness. In the pre-war period, interception rates of 30% to 50% were considered excellent; that meant that over half the sorties sent out would return without having encountered the enemy. During the Battle, average rates were around 90%, and several raids were met with 100% success rates. Lacking their own direction system, Luftwaffe fighters had little information on the location of their RAF counterparts, and often returned to base having never seen them. When they did, the RAF fighters were almost always in an advantageous position.
Although many histories of the Battle of Britain comment on the role of radar, it was in conjunction with the Dowding system that radar was truly effective. This was not lost on Winston Churchill, who noted that:
All the ascendancy of the Hurricanes and Spitfires would have been fruitless but for this system which had been devised and built before the war. It had been shaped and refined in constant action, and all was now fused together into a most elaborate instrument of war, the like of which existed nowhere in the world.
Development
Previous systems
To counter air raids on London during World War I, Edward Ashmore constructed a system known as the London Air Defence Area (LADA). Ashmore put defensive weapons into three rings around the city, searchlights and anti-aircraft artillery in the outer ring, fighter aircraft in the middle ring, and the innermost ring in the city contained more anti-aircraft guns. Ashmore set up a large plotting table at Horse Guards in London. Information from spotters was relayed to this central room where wooden blocks were placed on a large map to indicate the location of aircraft and other information. Observers around the map could relay this information to one of 25 regional control rooms, who re-created the portions of the map relevant to them and passed the information to the various weapons in their region.
After the war, LADA was run by a War Office department known as Air Defence of Great Britain (ADGB). ADGB was responsible for the defence of the entire British Isles during the 1920s and 30s. LADA became the Metropolitan Area, and ADGB expanded on Ashmore's system to deal with longer ranged and faster moving aircraft. Coloured markers matched coloured areas on a sector clock marking off five-minute intervals. As plots were called in, the plotters used markers with the colour pointed to by the clock, which produced multi-coloured paths of markers on the table making easily followed tracks; the freshness of the information could be determined from the colour of the latest marker. An identical system was later set up in The Midlands.
The system lacked early detection, which was deemed essential as the performance of aircraft improved. Experiments with acoustic mirrors and similar devices were carried out but these always proved unsatisfactory, with detection ranges often as low as 5 miles (8.0 km) even in good conditions. Lacking an alternative, in December 1934, the Air Ministry (AM) made plans to deploy sound detection devices around London as part of the Thames Estuary plan.
RDF
A month after the Thames Estuary plan was approved, the Tizard Committee was formed to consider newspaper stories and other claims made over the years of electronic "rays" that could stop an airplane engine and even kill a pilot at long range. The committee consulted well-known radio expert Robert Watt for a judgement on the reports. Watt asked his assistant, Arnold Wilkins, to carry out the necessary calculations. Wilkins quickly concluded that it was impossible; the amount of radio energy needed would be well beyond the state of the art of existing electronics. When Watt asked about alternatives, Wilkins recalled a General Post Office (GPO) report on aircraft causing fading in radio reception, and suggested that this effect might be used to detect aircraft at long range. The two wrote a joint memo on the concept and returned it to the Tizard Committee in time for their first formal meeting in late January 1935.
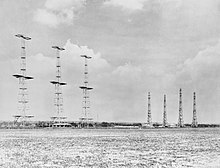
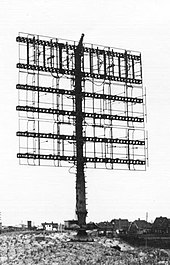
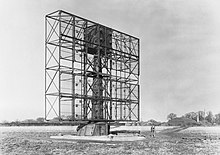
The committee seized upon the concept as a potential solution to the problem of bomber detection and the fear that the bomber will always get through. A second memo with more detailed calculations arrived in February and was shown to the Air Member for Supply and Research, Hugh Dowding. He was impressed with the concept but wanted a practical demonstration. This was carried out on 26 February 1935 in what is now known as the Daventry Experiment, a lash-up using existing equipment clearly indicated the presence of a nearby aircraft. Dowding immediately released funding for development. By the summer of 1935 the system, code-named "RDF", was able to detect bomber-sized targets at ranges of 60 miles (97 km). Plans were made to build a chain of RDF stations at about 25 miles (40 km) intervals along the English coast in a system called Chain Home (CH).
On 27 July, Henry Tizard suggested running a series of experiments of fighter interception, based on an estimated fifteen-minute warning time that RDF would provide. A seven-month-long series of tests began in the summer of 1936 at Biggin Hill, under the direction of Wing Commander Eustace Grenfell aided by a navigation expert, Squadron Leader Robert Linton Ragg.Gloster Gauntlet fighters intercepted virtual aircraft, civilian airliners and then Bristol Blenheim light bombers.
The first interceptions were calculated using trigonometry and mechanical calculators but eventually Grenfell had enough of the "confounded machines" and directed a perfect interception by eye. Tizard introduced the equal angles method of rapidly estimating an interception point, by imagining the fighters and bombers at the opposite corners on the base of an isosceles triangle. The bombers were flying at a particular angle to the base and the controller sent the fighters along the opposite angle, to converge with the target at the apex of the triangle. With this Tizzy Angle, interception rates shot up and by the end of 1936 they were consistently above 90 percent when the altitude was known and did not change. If the bombers changed their altitude, or the fighters arrived below them, manoeuvring for the attack reduced the success rate to about 60 percent.
Teething trouble
ADGB was disbanded in 1936, its duties were handed to the Air Ministry, and divided into Fighter Command and Bomber Command. Dowding was promoted to Air Officer Commanding-in-Chief of Fighter Command on its creation on 6 July 1936.
The first operational CH station was set up at the radar researchers' new laboratory at Bawdsey Manor. In spite of rapid progress, RDF still had teething problems. On one occasion, Dowding was watching the displays of the test system for any sign of the attackers when he heard them pass overhead, a complete failure. These problems were remedied over the next year, and in April 1937, tests using the prototype CH radar at Bawdsey demonstrated great promise. This version also allowed the controllers to measure the altitude of the aircraft to within 2,000 feet (610 m).
To increase warning time, the CH systems were built close to the shore facing out to sea, placing them as close to the enemy as possible. This meant they provided no information on the location of friendly fighters on the way to the attack, or of enemy aircraft once they crossed the coast. For these areas, Dowding planned to rely on the existing Observer Corps (OC) system that Fighter Command inherited from ADGB.
Using different equipment, the reports from CH and the OC were sometimes contradictory, and the volume of information supplied by the national network was overwhelming. An added problem was the lack of identification of the aircraft; CH could not discriminate between friendly and hostile aircraft, and the OC could not discriminate between friendly and enemy fighters when they were flying at high altitude.
To address the problem of identification, Dowding pressed for a supply of high-frequency direction finding (huff-duff) sets, which could locate the fighters using signals broadcast from their existing radio sets. This led to the introduction of the "pip-squeak" system that was widely available from early 1940, along with the first identification friend or foe (IFF) transponders which were available in some quantity by October 1940. This solved the identification problem, but meant that there were now three sources of information, RDF, OC and huff-duff, none of which had a complete picture of the airspace.
Building the system
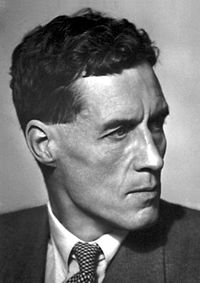
Dowding recognized that the main problem was not technical but too many sources of information, none of them with complete coverage, and none able to report useful information to the fighters on their own. Dowding, Tizard, and mathematician Patrick Blackett, another founding member of the committee, began evolving a new system that inherited concepts from ADGB.
To handle the mass of data and the potential for overlap, Dowding instituted a policy of sending all location reports from the radars to a new fighter direction centre at Fighter Command headquarters. This mimicked the system the OC had already set up for coordinating the reports from many individual spotters into a map covering a larger area. The new system did the same at a far larger scale, all of the UK. Telephone operators in contact with the CH and OC centres relayed reports to workers around the map, who used these reports to place small coloured markers on the map. The markers formed lines which, as they elongated, indicated the location and direction of the targets. As they were identified, each cluster was assigned a number, its "track".
As the paths of the targets became clear over time, operators observing the map picked tracks heading towards the various fighter groups and forwarded the information to the group headquarters. The group HQs used these reports to recreate a portion of the master map containing just the tracks relevant to them. Commanders at the group headquarters could easily picture the battle in their area and assign fighters to targets. Targets assigned to squadrons within a sector were forwarded in this same fashion to the sector headquarters, which recreated the map at an even larger scale, using this map to guide their fighters.
By early 1939, the basic system had been built out, and from 11 August 1939, Bomber Command was asked to launch a series of mock attacks using aircraft returning from exercises over France. Reports from No. 11 Group RAF were enthusiastic, stating that "RDF information and plotting throughout the Exercise was consistently first-rate, and enabled interceptions to be effected on the Coast", to which Dowding added "daylight raids were normally tracked and intercepted with ease and regularity".
Description
Filtering

The first improvement Dowding suggested was to add a filter room at FCHQ, where all CH reports were sent.
CH stations converted their angle and range measurements into a location on the Ordnance Survey National Grid. The filter room was organized around a large map with the same grid on it. Reports from the radar stations were forwarded to telephone operators in the filter room, the tellers, who would connect to a worker standing around the map, the plotters, and relay the information from the radar site to the plotter closest to that location on the map. The plotter would then look at the sector clock and then drop a coloured marker at the indication location. The colour system was the same as that used by the Observer Corps to indicate the time of the report. The rapidity of reporting caused plot markers to pile up on the map, which became quite cluttered during larger missions. Since each station had inaccuracies, the plots spread out on the map.
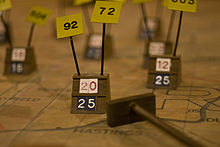
Observers watching the progress of plots tried to determine which of these represented one group of aircraft. When they were confident that a group of markers was a single formation, a wooden block was placed on the map in the middle of the plots and numbers and letters placed on the block to indicate the aircraft type, number and altitude. Each block was also given a track number, typically two digits. The block would be periodically moved or revised as further plot markers were placed on the board. As the block moved, plotters left small arrow-shaped pointers to illustrate where it had been. Once created, the entire network used the same track numbers, from the radar operators who could be asked to revise information for a given track to the pilots intercepting them.
Around and above the map were more tellers who were connected to the Group headquarters. These tellers relayed information about the track markers to the tellers at Group, who in turn relayed this information to their own plotters. The track blocks used large print to allow them to be read from a distance, although this sometimes required opera glasses.
Sometimes information would have to be plotted that came from an external source, not normally part of the reporting chain; a fighter calling an SOS would report this through his radio on an emergency frequency, which would be picked up by the closest listening post. This information would also flow into the filter room but they were not connected to the plotters on the floor. Operators above the map could mark locations of interest using theatrical spotlights and filters allowed them to change the message being projected.
Reporting hierarchy

The second improvement introduced by Dowding was aimed at reducing the amount of information being sent to the pilots, and speeding its delivery. For this task, Dowding introduced a hierarchy of control and information flow which ensured that only the information the pilots needed was forwarded to them. At the topmost level was FCHQ filter room, located at Bentley Priory. FCHQ maintained an overall view of the entire battlespace. This information was then forwarded one step down a hierarchy, to the Groups.
During the Battle of Britain the defensive fighters were split among four active Groups, 10 through 13. 11 Group, which handled most of the fighting, had its plotting room (preserved as the Battle of Britain Bunker) at RAF Uxbridge, not far from FCHQ. 12 Group, covering the Midlands, was located at RAF Hucknall (and later RAF Watnall) near Nottingham, 13 Group in a quarry in Blakelaw outside Newcastle, and the late-formed 10 Group at RAF Box (later renamed RAF Rudloe Manor) outside Bath.
At the Group HQs another plotting board, covering only the area of interest to that Group, re-created the plots from FCHQ via position reports sent to them over the telephone. This allowed the Groups to re-create the map, but on a scale and location more suitable to their area of operations. Since the information was being pre-filtered, these maps did not have to be changed as often, and a somewhat simpler marker solution was adopted. Small wooden blocks with tags were placed on the map to represent the location of various formations, indicated by the ID number created in the filter room. The tags indicated the ID number, friend or foe status if known ("H" meant "hostile", F for "friendly"), the estimated number of aircraft, and their altitude. The colour of the altitude tags indicated when the report was updated, matching the same sector clock pattern used at FCHQ. This allowed observers to quickly determine whether or not a plot was up to date, and request updates if needed. If a target was assigned squadrons for interception, these were indicated with cocktail stick-like tags with the squadron number on them.
Each Group was split into several Sectors, which handled operations for one or more airfields. This formed the lowest level of the hierarchy, based at the Sector Controls, normally co-located at one of the sector's airfields. For instance, 11 Group was split into sectors A through F running anticlockwise from the south-west to north-east, along with Sector Z to the northwest. A typical sector, Sector C which saw considerable action, was controlled out of Biggin Hill, but also contained another major airbase at West Malling (Maidstone). Telephone links from Sector to Group allowed the Group's version of the map to be re-created at the Sector, again filtering out information that was not of interest in that area.
It was the Sector Controls that were responsible for communication with the pilots, as well as barrage balloon and anti-aircraft batteries, providing early warning of the approach of the enemy or warning them not to fire on friendlies. To combat the problem that the fighter pilots tended to ignore orders from paper pushers, Sector Commanders were normally former pilots themselves, either retired or on medical leave. Dowding, Blackett and Tizard personally drove home the fact that the pilots could not simply hunt for their targets, and had to follow the instructions of the operations centres.
By creating this system, information flow was primarily in one direction and continued to be split out on the way down. For instance, the filter room might be receiving 15 reports per minute from various CH sites, but these would be about formations that might cover the entire coast of Great Britain. Portions of these reports, say those over Kent, would be sent to 11 Group, while others, the attack on RAF Driffield for instance, would only be relayed to 13 Group. In turn, 11 Group's operations room would relay only those tracks of interest down to the sectors, filtering out tracks that were out of their range, or being handled by other sectors. Finally, the sector operators only had to relay information to the pilots that actually had an effect on their flight – data about other formations was not relayed, freeing the radio time.
Information sources
Chain Home offered an enormous improvement in early detection times compared to older systems of visual or acoustic location. It was not uncommon for CH stations on the southeast coast of Kent to detect enemy raids as they were still forming up over their airfields in France. Additionally, this information was available day or night, in any weather. However, to provide maximum warning time, the CH stations had to be placed as close to the shore as possible. As they could only locate objects in front of them, this meant that CH provided no service over land. This required two additional locating services.
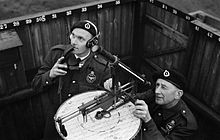
The task of tracking enemy aircraft over land fell to the Royal Observer Corps. Because of the large number of ROC stations and the relatively small areas they covered, information duplication and overload was a concern. For this reason, information from the ROC was sent to a parallel system of Observer Centres, who acted as both filter and communications stations. This pre-filtered information was then sent into the Dowding reporting chain.
Likewise, a separate reporting chain was tasked with tracking friendly aircraft through the use of radio direction finding (RDF) on their radio transmissions, using a system known as Huff-Duff (receivers) and pip-squeak (transmitter). Developing a fix using RDF requires two or more observation locations spread apart by some distance and then using triangulation on their reports. In this case three stations were typically used, located about 30 miles (48 km) apart. This information was reported to a selected Sector Control, who used this to plot their locations and pass on that information to the main operations plot. Controllers could then give directions the squadrons. Locations of the fighters were sent up the chain only as required.
Finally, information on the status of the fighter squadrons was known to the Sectors but needed by the Groups to choose which squadrons to commit. For this task, operations rooms also contained a series of blackboards and electrical lamp systems indicating the force strengths of the fighter squadrons and their current status. Known as the "tote board", this allowed commanders to tell at a glance which units were available to receive commands. The statuses were Released (not available); Available (able to be airborne in 20 minutes); Readiness (airborne in 5 minutes); Standby (pilots in cockpit, airborne in 2 minutes); Airborne and moving into position; Enemy sighted; Ordered to land; Landed and refuelling/rearming. Next to the tote board was a weather board. It was the responsibility of the Women's Auxiliary Air Force (WAAF) plotters to continually update the tote and weather boards, and relay that information up the chain.
Command
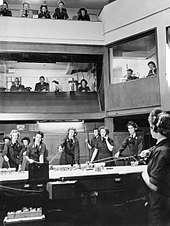
The most visible part of the Dowding System were the "operations rooms". The most advanced of these were located at FCHQ and Group HQs. These rooms typically consisted of three layers: a large plotting table on the lowest level, communications operators located at desks around and above the plot, and a second storey above the plot, sometimes behind glass, where commanders could observe and communicate.
Command of the battle was devolved to the group. Observing the map from above, group commanders could track the movements of enemy aircraft through their patch, examine the tote board, select a squadron and called their sector to have them scramble. The orders could be as simple as "Squadron nine-two, intercept hostile two-one".
The sector would then phone the office for that squadron (often nothing more than a small shack) and order the aeroplanes to be scrambled. After forming up, the sector controller asked the squadron to set up their pip-squeak system so they could be tracked. Once their location was measured and transferred to the sector plotting table, the controller would relay instructions to the formation leader. Vectoring was accomplished using the methods developed in the Biggin Hill exercises in 1935, with the sector commander comparing the location of the friendly aircraft with the hostile plots being transferred from group and arranging the interception.
Squadrons, bases and enemy formations were assigned code words to ease communication speed and accuracy. For instance, the sector control at Biggin Hill was assigned the name "Sapper", while the 72 Squadron, stationed at Biggin Hill, was known as "Tennis". Thus, an update on an enemy's position might take the form "Tennis leader this is Sapper control, your customers are now over Maidstone, vector zero-nine-zero, angels two-zero". In this example the Biggin Hill controller (Sapper) was asking 72 Squadron (Tennis) to fly due east (vector zero-nine-zero) at 20,000 feet (6,100 m) (angels two-zero) to intercept their target which was at that point flying over Maidstone. The sector was also responsible for local gun and balloon defences and getting the fighters safely back to an airfield after the sortie.
Physical construction

FCHQ and Group Control centres, in keeping with their importance in the battle, were located in bomb-proof bunkers away from airfields. Most of these were built just before the war. Communications were ensured by hundreds of miles of dedicated phone lines laid by the GPO and buried deep underground to prevent them from being cut by bombs.
Sector Control centres tended to be relatively small, and were mostly housed in brick, single-storey, tile-roofed structures above ground, where they were vulnerable to attack. By 1940, most were semi-protected by an earth bank or "blast wall" surrounding them which reached as high as the eaves. Fortunately, Luftwaffe Intelligence was unaware of the importance of these rooms and most were left alone.
The control rooms at Biggin Hill were destroyed by a raid on 31 August, but this was due to a chance bomb hit. As a further precaution, emergency control rooms were set up in different locations away from the airfields, with small loss in efficiency; Kenley, for example, could use an alternative room housed in a butcher's shop in nearby Caterham.
The vulnerability of the earlier rooms was appreciated, and new airfields built during the expansion programme of the 1930s used bombproof Mk. II, L-shaped structures.
Effects on the battle
The effect of this system was profound, and remains a widely used example of the concept of force multiplication.
Before the introduction of radar the task of interception appeared to be increasingly difficult, if not impossible. As bomber speeds and altitudes grew, the time available to arrange an interception was dropping. Although fighter performance was also increasing, certain aspects like getting the pilot into the aircraft and taking off introduced fixed delays that did not improve. With the only detection means being the observers and acoustic location with ranges on the order of 20 mi (32 km) under the very best conditions, the bombers would be over their targets before the spotters could call in the raid and the fighters could climb to their altitude.
Given this lopsided balance of power, fighter operations prior to the introduction of radar were generally in the form of standing patrols or "sweeps", with the fighters being sent up to fly along a pre-arranged path or area in the hopes of encountering the enemy. During World War I interception missions, the vast majority of patrols returned home without ever having seen the enemy. The same was true for all forces during the Battle of France, where 30% interception rates were considered typical, and 50% excellent.
In the case of an attack by a high-speed force, the attackers could pick the time and place of the attack. They would encounter only the aircraft already in the air along that route, so they could outnumber the defenders in any given area. To ensure there were a reasonable number of fighters along any approach route, huge numbers of aircraft would need to be in the air at all times covering all the routes. Since a fighter spends most of its time on the ground being maintained and refuelled, some multiple of the airborne numbers would be needed, along with a similarly huge number of pilots, as each pilot could only be expected to fly so long per day. Such a system was essentially impossible, and was one of the reasons it was widely believed that "the bomber will always get through".
A startling illustration of this scenario was provided by the RAF itself. In the summer of 1934, a series of large-scale exercises with up to 350 aircraft were carried out. About half the number were bombers attempting to approach London, and the other half fighters trying to stop them. The initial results were so dismal that the commanders attempted to improve the results, eventually giving the fighter controllers complete details of the bomber's locations prior to the mission. Even then, 70% of the bombers reached London without having even seen a fighter. The result was, as one RAF commander put it, that "a feeling of defencelessness and dismay, or at all events of uneasiness, has seized the public."
The unified view of the battlespace provided by the Dowding system turned the tables in favour of the defence. By rapidly sending accurate, timely information to the fighters, their ability to find and attack the enemy was dramatically increased, and the time required to do so decreased. The fighters took off, flew directly to their targets, engaged, and returned directly to their bases. In early operations interception rates of 75% were routine, and this number continued to improve as the operators became more familiar with their tasks. By the end of the Battle of Britain, rates of interception over 90% were becoming common, and several raids were met with 100% interception rates. In numerical terms, it was as if Fighter Command had over twice as many fighters, giving them effective parity with the Luftwaffe.
While CH was being installed in the UK, the Germans were working on their own radar systems and had deployed an excellent early-warning system known as Freya. The complexity of relaying the information from the radars to the fighters had not been addressed and was apparently never seriously considered at the time. During the Battle of the Heligoland Bight in 1939, over 100 German aircraft were scrambled to meet a small force of RAF bombers, but less than half of these found them. This was in spite of a Luftwaffe Freya detecting the raid while it was still one hour away from their target; there was no way for the radar operators to communicate with the fighters. The only radar reports to reach the fighters came from a naval Freya near the target, too late to improve matters.
Similar events occurred during the attack on Pearl Harbor. The Opana Radar Site detected the Japanese aircraft about an hour before they reached the island. They telephoned the communications office that was in charge of disseminating such information and made their report. The office had been informed that a flight of B-17 Flying Fortress bombers would be arriving that day, but lacked any sort of information on their location, at that time far to the east. The communications officer, Lt. Kermit Tyler, concluded the radar site had spotted the bombers and failed to pass on the warning. The Japanese attack went unopposed.
It was only through the combination of all of the elements of the Dowding system that an effective defensive network was created. Peter Townsend later noted that:
The Germans knew about British radar but never dreamed that what the radar 'saw' was being passed on to the fighter pilot in the air through such a highly elaborate communications system.
During the early war period, the Luftwaffe consistently underestimated the value of the system. A 16 July 1940 Luftwaffe intelligence report failed to even mention it, in spite of being aware of it through signals intercepts and having complete details of its World War I predecessor. A later report on 7 August did make mention of the system, but only to suggest that it would tie fighters to their sectors, reducing their flexibility and ability to deal with large raids.
While discussing the events with British historians immediately after the war, Erhard Milch and Adolf Galland both expressed their belief that one or two CH stations might have been destroyed during early raids, but they proved difficult targets. This was true; several stations had been knocked out of service for a time, while others managed to maintain operations in spite of attacks. But the historians interviewing them noted, "neither seemed to realize how important were the RDF stations to Fighter Command technique of interception or how embarrassing sustained attacks upon them would have been."
This realisation must have sunk in over time; after the war Galland noted:
From the first the British had an extraordinary advantage, never to be balanced out at any time during the whole war, which was their radar and fighter control network and organization. It was for us a very bitter surprise. We had nothing like it. We could do no other than knock frontally against the outstandingly well-organized and resolute direct defence of the British Isles.
Problems
Although the Dowding system proved itself in combat, the system and command of the battle had several problems. A huge volume of information flowed through the system, especially into the FCHQ filter room. On 11 January 1940, an operations research report on the Dowding system concluded that the filter room had been intended to correlate radar reports, but had developed into something much more complicated. Too much control took place in the filter room, which was producing results with "appallingly low standards". Given the success of the FCHQ filter room, it is unclear whether the report was inaccurate or if the problems had been solved by the time of the Battle of Britain.
It was known that the filter room could be overwhelmed by a high volume of reports, and it was a constant complaint that it was a single point of failure in reports from OR and in the RAF and Air Ministry. Most critics wanted the filter room to be moved from Bentley Priory to Group commands, lowering the reporting volume at each location and providing duplication. Dowding refused the change, leading to increasing friction with other commanders. Information overload occurred on several occasions and the filter room had to ask certain CH stations to stop reporting. But this had little effect on their capabilities. Later, stations reported information for multiple formations as a single plot.
Radio communications was another problem. The TR.9D HF radio telephone set in fighters at the time of the Battle of Britain had two channels and the operating frequencies of the two could only be selected before take-off. One channel was used for voice communication between the aircraft and the other for communications with sector control, which was also used by the "pip-squeak" system. With the channels set to squadron-specific frequencies, the TR.9D limited the ability to coordinate with other squadrons. The set was low power, with a range of about 40 miles (64 kilometres) air-to-ground and 5 mi (8.0 km) air-to-air, which presented numerous problems with reception quality. The TR.9 originally operated on a band that was relatively empty, but by the time of the war it was much busier and interference was a constant problem.
Chain Home could only produce information of aircraft in "front" of the antennas, typically off-shore, and the reporting system relied on the OC once the raid was over land. The OC, using sight, could provide little information at night, in bad weather or through overcast. During the Battle of Britain, the weather was unusually good, the so-called "fighter's summer", and the OC was further aided by the fact that German raids took place only when the weather allowed the bombers to see their targets. The system failed to work against high-altitude raids that took place late in the battle.
The effectiveness of the system was also influenced by personal and inter-group rivalries within the RAF command, particularly between 11 Group and 12 Group, whose commanders constantly bickered. Trafford Leigh-Mallory, commander of 12 Group, had originally been slated to take over 11 Group command but it went to Keith Park instead. Leigh-Mallory felt further slighted by Dowding because 12 Group had to defend 11 Group airfields while 11 Group attacked the Germans.
Dowding failed to centralise a command structure at FCHQ, which meant that group commanders controlled their own battle and could request, but not demand, support from other groups. During the battle, Leigh-Mallory repeatedly failed to send his fighters to cover 11 Group airfields, preferring instead to build his "Big Wing" formations to attack the Luftwaffe. Big Wings took time to assemble and were often incomplete as the Germans flew away, and thus contributed little to the early stages of the battle.
Aftermath
Dowding resisted suggestions to devolve the filter room to the group level to reduce demand on FCHQ. The matter was raised several times, the last time on 27 September, when the Air Council's request was once again dismissed by Dowding. He was then summoned to the Air Staff on 1 October and was forced to implement this change, although he delayed this until all fighters were equipped with new IFF Mark II systems.
On 24 November 1940, Dowding was removed from command. This was due partly to his lack of action on ending the feud between Leigh-Mallory and Park, partly due to his refusal to devolve command, and partly due to the lack of success against the increasing tempo of night bombing, which by this time had become The Blitz.
The groups soon had their own filter rooms. The introduction of ground-controlled interception radars (GCI) in the winter of 1940–41 allowed further devolution of command because sector controllers could directly detect and control the aircraft in their area. Working with IFF, now widely used, the GCI display eliminated the need for separate detection and plotting, as well as the communications links and manpower needed to operate the reporting system. The Dowding system remained in use for the rest of the war for daytime missions, both for (rare) defensive situations, as well providing support for aircraft supporting offensive daytime raids during 1943 and later.
After the war, the fighter control system was largely demobilized. The explosion of the Soviet atomic bomb in 1949 and the presence of Tupolev Tu-4 "Bull" aircraft that could deliver it to the UK led to the rapid construction of the ROTOR system. ROTOR re-used many existing GCI and CH systems with more sophisticated control rooms in fortified underground bunkers. ROTOR was itself replaced by AMES Type 80 Master Control rooms and then the Linesman/Mediator system in the 1960s.
Citations
Bibliography
- Bowen, Edward George (1998). Radar Days. CRC Press. ISBN 978-0-7503-0586-0.
- Bungay, Stephen (2010). Most Dangerous Enemy: An Illustrated History of the Battle of Britain. Zenith Press. ISBN 978-0-7603-3936-7.
- Burns, Russell (2006). "The Evolution of Modern British Electronics, 1930–1945". Transactions of the Newcomen Society. 76 (2): 221–234. doi:10.1179/037201806X119822. S2CID 108454463.
- Coakley, Thomas (1992). Command and Control for War and Peace. DIANE Publishing. ISBN 978-0-7881-0825-9.
- Corrigan, R. (September 2008). Airborne minefields and Fighter Command's information system (PDF). GikII 2008. University of Edinburgh School of Law. Archived from the original (PDF) on 23 August 2012. Retrieved 11 January 2014.
- Gough, Jack (1993). Watching the Skies: The History of Ground Radar in the Air Defence of the United Kingdom. Her Majesty's Stationery Office. ISBN 978-0117727236.
- The Battle of Britain; August – October 1940. Ministry of Information on behalf of the Air Ministry. 1941. OCLC 5245114 – via Marshall Stelzriede's Wartime Journal.
- Ramsay, Winston, ed. (1989). The Battle of Britain Then and Now (Mk V ed.). London: Battle of Britain Prints International. ISBN 978-0-900913-46-4.
- Watson, Jr., Raymond C. (2009), Radar Origins Worldwide, Trafford Publishing, ISBN 9781426991561
- Westley, Max (Autumn–Winter 2010). "Pip-Squeak – the Missing Link". Duxford Radio Society Journal.
- Zimmerman, David (2001). Britain's Shield: Radar and the Defeat of the Luftwaffe. Sutton. ISBN 978-0-7509-1799-5.
- Zimmerman, David (2013). "Information and the Air Defence Revolution, 1917–40". In Goldman, Emily (ed.). Information & Revolutions in Military Affairs. Routledge. ISBN 978-1-136-82779-2. First published in: Zimmerman, David (2004). "Information and the Air Defence Revolution, 1917–40". Journal of Strategic Studies. 27 (2): 370–394. doi:10.1080/0140239042000255968. S2CID 153613073.
Further reading
- "Understanding The Dowding System". The Association of RAF Fighter Control Officers. Retrieved 19 September 2021.
- "The Battle of Britain; August – October 1940". Battle of Britain 70th Anniversary. Royal Air Force. Archived from the original on 18 January 2013. Retrieved 11 January 2014.
External links
- The Filter Room - WW2 - Radar Command, World War II film on the role of the Filter Room.


