Goniometer
A goniometer is an instrument that either measures an angle or allows an object to be rotated to a precise angular position. The term goniometry derives from two Greek words, γωνία (gōnía) 'angle' and μέτρον (métron) 'measure'. The protractor is a commonly-used type in the fields of mechanics, engineering and geometry.
The first known description of a goniometer, based on the astrolabe, was by Gemma Frisius in 1538.
Protractor
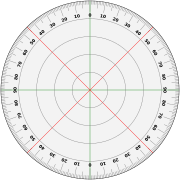
A protractor is a measuring instrument, typically made of transparent plastic or glass, for measuring angles. Some protractors are simple half-discs or full circles. More advanced protractors, such as the bevel protractor, have one or two swinging arms, which can be used to help measure the angle.
Most protractors measure angles in degrees (°). Radian-scale protractors measure angles in radians. Most protractors are divided into 180 equal parts. Some precision protractors further divide degrees into arcminutes.
Bevel
A bevel protractor is a graduated circular protractor with one pivoted arm; used for measuring or marking off angles. Sometimes Vernier scales are attached to give more precise readings. It has wide application in architectural and mechanical drawing, although its use is decreasing with the availability of modern drawing software or CAD.
Universal bevel protractors are also used by toolmakers; as they measure angles by mechanical contact they are classed as mechanical protractors.
The bevel protractor is used to establish and test angles to very close tolerances. It reads to 5 arcminutes (5′ or 1/12°) and can measure angles from 0° to 360°.
The bevel protractor consists of a beam, a graduated dial and a blade which is connected to a swivel plate (with Vernier scale) by thumb nut and clamp. When the edges of the beam and blade are parallel, a small mark on the swivel plate coincides with the zero line on the graduated dial. To measure an angle between the beam and the blade of 90° or less, the reading may be obtained direct from the graduation number on the dial indicated by the mark on the swivel plate. To measure an angle of over 90°, subtract the number of degrees as indicated on the dial from 180°, as the dial is graduated from opposite zero marks to 90° each way.
Since the spaces, both on the main scale and the Vernier scale, are numbered both to the right and to the left from zero, any angle can be measured. The readings can be taken either to the right or to the left, according to the direction in which the zero on the main scale is moved.
Gallery
A 400 gon protractor marked in gradians.
A "Cras navigation plotter" double-protractor, in foreground, named after his inventor Jean Cras.
Geodreieck, a special type of protractor triangle (180°).
Applications

Surveying
Prior to the invention of the theodolite, the goniometer was used in surveying. The application of triangulation to geodesy was described in the second (1533) edition of Cosmograficus liber by Petri Appiani as a 16-page appendix by Frisius entitled Libellus de locorum describendorum ratione.
Communications
The Bellini–Tosi direction finder was a type of radio direction finder that was widely used from World War I to World War II. It used the signals from two crossed antennas, or four individual antennas simulating two crossed ones, to re-create the radio signal in a small area between two loops of wire. The operator could then measure the angle to the target radio source by performing direction finding within this small area. The advantage to the Bellini–Tosi system is that the antennas do not move, allowing them to be built at any required size.
The basic technique remains in use, although the equipment has changed dramatically. Goniometers are widely used for military and civil purposes, e.g. interception of satellite and naval communications on the French warship Dupuy de Lôme uses multiple goniometers.
Crystallography
In crystallography, goniometers are used for measuring angles between crystal faces. They are also used in X-ray diffraction to rotate the samples. The groundbreaking investigations of physicist Max von Laue and colleagues into the atomic structure of crystals in 1912 involved a goniometer.
Light measurement
Goniophotometers measure the spatial distribution of light visible to the human eye (often luminous intensity) at specific angular positions, usually covering all spherical angles.
In medicine
A goniometer is used to document initial and subsequent range of motion, at the visits for occupational injuries, and by disability evaluators to determine a permanent disability. This is to evaluate progress, and also for medico-legal purposes. It is a tool to evaluate Waddell's signs (findings that may indicate symptom magnification.)
Rehabilitative therapy
In physical therapy, occupational therapy, and athletic training, a goniometer measures range of motion of limbs and joints of the body. These measurements help accurately track progress in a rehabilitation program. When a patient has decreased range of motion, a therapist assesses the joint before performing an intervention, and continues to use the tool to monitor progress. The therapist can take these range of motion measurements at any joint. They typically require knowledge about the anatomy of the body, particularly bony landmarks. For example, when measuring the knee joint, the therapist places the axis (point of rotation) on the lateral epicondyle of the femur, and lines up the stationary arm with the greater trochanter of the femur. Finally, the therapist lines up the moveable arm of the goniometer with the lateral malleolus of the fibula, and records a measurement using the degree scale on the circular portion of the tool. Reading accuracy is sometimes a problem with goniometers. Issues with the intra-measure (between measures) and inter-tester (between clinicians) reliability may increase as the experience of the examiner decreases. Some studies suggest that these errors can be anywhere between 5 and 10 degrees.
These goniometers come in different forms that some argue increase reliability. The universal standard goniometer is a plastic or metal tool with 1 degree increments. The arms are usually not longer than 12-inches, so it can be hard to accurately pinpoint the exact landmark for measurement. The telescopic-armed goniometer is more reliable—with a plastic circular axis like a classic goniometer, but with arms that extend to as long as two feet in either direction.
More recently in the twenty-first century, smartphone application developers have created mobile applications that provide the functions of a goniometer. These applications (such as Knee Goniometer and Goniometer Pro) use the accelerometers in phones to calculate joint angles. Recent research supports these applications and their devices as reliable and valid tools with as much accuracy as a universal goniometer.
Modern rehabilitative therapy motion capture systems perform goniometry at the very least measuring active range of motion. While in some cases accuracy may be inferior to a goniometer, measuring angles with a motion capture system is superior at measuring during dynamic, as opposed to static situations. Furthermore, using a traditional goniometer takes valuable time. In the clinical context, performing manual measurements takes valuable time and may not be practical.
Surface science
Contact angle goniometer

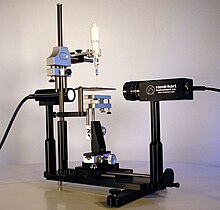
In surface science, an instrument called a contact angle goniometer or tensiometer measures the static contact angle, advancing and receding contact angles, and sometimes surface tension. The first contact angle goniometer was designed by William Zisman of the United States Naval Research Laboratory in Washington, D.C. and manufactured by ramé-hart (now ramé-hart instrument company), New Jersey, USA. The original manual contact angle goniometer used an eyepiece with a microscope. Today's contact angle goniometer uses a camera and software to capture and analyze the drop shape, and is better suited for dynamic and advanced studies.
Surface tension
Contact angle goniometers (q.v.)can also determine the surface tension for any liquid in gas or the interfacial tension between any two liquids. If the difference in densities between the two fluids is known, the surface tension or interfacial tension can be calculated by the pendant drop method. An advanced instrument often called a goniometer / tensiometer includes software tools that measure surface tension and interfacial tension using the pendant drop, inverted pendant drop, and sessile drop methods, in addition to contact angle. A centrifugal adhesion balance relates the contact angles to the adhesion of the drop to the surface. A gonioreflectometer measures the reflectivity of a surface at a number of angles.
Positioning
A positioning goniometer or goniometric stage is a device that rotates an object precisely about a fixed axis in space. It is similar to a linear stage— however, rather than move linearly relative to its base, the stage platform rotates partially about a fixed axis above the mounting surface of the platform. Positioning goniometers typically use a worm drive with a partial worm wheel fixed to the underside of the stage platform meshing with a worm in the base. The worm gear may be rotated manually, or by a motor in automated positioning systems.
Knife and blade cutting edge angle measurement
The included cutting angles of all kinds of sharp edge blades are measured using a laser reflecting goniometer. Developed by the Cutlery and Allied Trades Research Association (CATRA) in the UK, a range of devices can accurately determine the cutting edge profile, including a rounding of the tip to ½°. The included angle of a blade is important in controlling its cutting ability and edge strength—i.e., a low angle makes a thin sharp edge optimized for cutting softer materials, while a large angle makes a thick edge that is less sharp but stronger, which may be better for cutting harder materials.
Doctor blade inspection
Used doctor blades, from gravure and other printing and coating processes, can be inspected with a goniometer, typically with a built-in light source, to examine the blade edge for wear and correct angles. A difference in angle from that set on the machine may indicate excessive pressure, and a range of angles ("rounding") probably indicates a lack of stiffness, or wear, in the blade holder assembly.
See also
- Instrumentation – Measuring instruments which monitor and control a process
- SCR-277 – radio range setPages displaying wikidata descriptions as a fallback
- Trigonometry – Area of geometry, about angles and lengths
- Compass (drawing tool) for drawing circles or arcs
- French curve
- Inclinometer
- Sliding T bevel
- Birkhoff's axioms
- Technical drawing tools
- Centiturns
- Romer


